Integrations
Our platform features a dedicated menu for managing all integrations, providing an easy setup process for seamless connectivity.
Real Scout v1
Real Scout home search platform that allows realtors to collaborate with their clients around home searches.

Follow Up Boss (FUB)
Integrating Follow Up Boss with lead sources and tracking pixels enables automatic lead capture and detailed visitor tracking, pixels track interactions for better retargeting and conversion insights.

To ensure smooth data integration, please use the naming conventions specified by here .
Honely
Honely.com is a third-party application that provides market reports for the next three years.

Google Analytics/GTM
Import Container
Download GTM Default Workspace JSON
- Go to Tag Manager → Admin → Import Container
- Choose your .json file → Select import option (Merge/Overwrite) → Confirm
- Create Version → Add name/description → Save
Update Analytics
- Go to Tags → Find your Analytics tag → Edit
- Update Measurement ID (G-XXXXXXXXXX for GA4)
- Save → Submit → Publish
Manual Setup
Both CF7 and IHF is being tracked
Step 1: Create Data Layer Variables
Step 1. Navigate to GTM → Variables → Click New.
Step 2. Choose Data Layer Variable.
Step 3. Set the Variable Name (matching the data layer keys exactly).
Step 4. Repeat for each:
event_fromform_idform_titlegbraidgclidutm_campaignutm_contentutm_mediumutm_sourceutm_termwbraid
Step 5. Save each variable.
✅ Refinement:
- Use a naming convention like
DLV – event_fromto clearly differentiate them. - Ensure your site pushes these values into the Data Layer before the event fires.
Step 2: Create a Trigger
Step 1. Navigate to GTM → Triggers → Click New.
Step 2. Name it "Form Submissions – AIOS".
Step 3. Trigger Type: Custom Event.
Step 4. Event Name: form_submission.
Step 5. Trigger Fires on: Some Custom Events.
Step 6. Condition:
event_fromcontains"AIOS Submission".
Step 7. Save the trigger.
✅ Refinement:
- If your event names are inconsistent, use RegEx Matching (
matches RegEx) to cover variations. - Validate that
event_fromis being pushed correctly into the data layer.
Step 3: Create a GA4 Event Tag
Step 1. Navigate to GTM → Tags → Click New.
Step 2. Choose Google Analytics: GA4 Event.
Step 3. Set the Measurement ID (or use a constant variable like {{GA4 Measurement ID}}).
Step 4. Event Name: form_submission.
Step 5. Add Event Parameters:
| Parameter | Value |
|---|---|
event_from | {{DLV – event_from}} |
form_id | {{DLV – form_id}} |
form_title | {{DLV – form_title}} |
gbraid | {{DLV – gbraid}} |
gclid | {{DLV – gclid}} |
utm_campaign | {{DLV – utm_campaign}} |
utm_content | {{DLV – utm_content}} |
utm_medium | {{DLV – utm_medium}} |
utm_source | {{DLV – utm_source}} |
utm_term | {{DLV – utm_term}} |
wbraid | {{DLV – wbraid}} |
You only need to include the necessary parameters; just pick what’s relevant. The event_from parameter specifies whether the form originates from Contact Form 7 or iHomeFinder.
Step 6. Triggering: Select "Form Submissions – AIOS" trigger.
Step 7. Save the tag.
✅ Refinement:
- Use Google’s recommended naming conventions for consistency.
- If missing values exist, use custom JavaScript variables to return
"undefined"instead of empty strings. - Add a debug mode flag (e.g.,
debug_mode: true) to track this event more easily in GA4 DebugView.
Step 4: Testing & Debugging
Before publishing, test your setup to confirm events fire correctly.
1️⃣ GTM Preview Mode
Step 1. Click Preview in GTM.
Step 2. Submit a form and inspect the Tag Assistant output.
Step 3. Confirm:
- The Custom Event (
form_submission) is triggered. - The GA4 Event fires with all expected parameters.
2️⃣ GA4 DebugView
Step 1. Open Google Analytics 4.
Step 2. Go to Admin → DebugView.
Step 3. Verify the form_submission event appears with all parameters.
3️⃣ Realtime Reports
Step 1. Navigate to GA4 → Reports → Realtime.
Step 2. Submit a form and check if form_submission appears.
✅ Refinement:
- If an event doesn’t show, confirm the Data Layer is populated before the tag fires.
- Use Google Tag Assistant or GA DebugView to track missing values.
- If UTM values are missing, check if they’re passed via the URL and stored correctly.
Step 5: Publish & Monitor
Once confirmed:
Step 1. Submit & Publish the GTM container.
Step 2. Monitor GA4 reports to ensure accurate data collection.
Step 3. Set up GA4 Custom Reports or Looker Studio dashboards for better tracking.
Do You Want to Add URL Parameters to All Internal Links in JavaScript?
Here’s how to Append URL Parameters to All Internal Links in JavaScript
document.addEventListener("DOMContentLoaded", function () {
    const currentParams = new URLSearchParams(window.location.search);

    // Exit if no parameters exist
    if (!currentParams.toString()) return;

    document.querySelectorAll("a").forEach(link => {
        const url = new URL(link.href, window.location.origin);

        // Skip if the URL contains "{{" or "%7D%7D" templating placeholder
        if (link.href.includes('{{') || link.href.includes('%7D%7D')) return;

        // Check if the link is internal
        if (url.origin === window.location.origin) {
            // Merge existing parameters with the new ones
            currentParams.forEach((value, key) => {
                url.searchParams.set(key, value);
            });

            link.href = url.toString();
        }
    });
});function add_ads_linking_body_className($classNamees) {
$page_ids = [123, 456, 789]; // Page IDs
$page_slugs = ['about-us', 'contact', 'services']; // Page Slugs
if (is_page($page_ids) || is_page($page_slugs)) {
$classNamees[] = 'aios-ads-linking';
}
return $classNamees;
}
add_filter('body_className', 'add_ads_linking_body_className');How It Works:
✅ Supports multiple page IDs or slugs
✅ Adds "aios-ads-linking" className only on the specified pages
✅ Works with CSS or JavaScript targeting
Mailchimp
Here’s a step-by-step guide for integrating Mailchimp and retrieving both your API Key and Audience ID:
How to Get Your Mailchimp API Key
Log in to Mailchimp:
Go to https://mailchimp.com and log into your account.
Navigate to API Keys:
- Click your profile icon (bottom left corner).
- Go to Account & billing.
- Click the Extras dropdown.
- Select API keys.
Create an API Key:
- Scroll to the “Your API keys” section.
- Click Create A Key.
- Give it a label (optional, for your reference).
- Copy the key. (Keep it secure — treat it like a password.)
How to Find Your Mailchimp Audience ID (List ID)
Go to the Audience Dashboard:
- From the left sidebar, click Audience.
- If you have more than one audience, choose the one you want to use.
Access Audience Settings:
- Click Manage Audience → Settings.
Find the Audience ID:
- Scroll to the Audience name and defaults section.
- You’ll see a field labeled Audience ID or List ID.
- Copy this ID — you’ll need it for your integration.

The Mailchimp integration was introduced in version 7.7.0.
Cloze
If you’re looking to integrate Cloze CRM with other tools or services, you’ll need an API key to authenticate and securely access your Cloze data. Cloze makes it easy to retrieve your personal API key directly from the dashboard — no need to contact support (if your plan includes API access).
Follow these steps to locate and copy your API key:
Log in to Cloze:
Go to https://www.cloze.com and log into your account.
Open the Menu
On the left sidebar, click the three dots (More menu).
Go to Settings
Select Settings from the dropdown.
Navigate to API Access
- In Settings, scroll to “Accounts and Services”.
- Click on “API Access”.
Copy Your API Key
- Your personal API key will be displayed here if your plan supports API access.
- Copy it and store it securely.

The Cloze integration was introduced in version 7.8.0.
Salesforce
If you need to integrate with Salesforce using OAuth (e.g., for a custom app or third-party platform), you’ll need to create a Connected App. Follow these steps to generate your Consumer Key and Consumer Secret.
Log in to Salesforce:
Go to https://login.salesforce.com and log into your account.
Accessing the Connected App Page
First, try opening the Connected Apps page in Salesforce Lightning Experience by visiting:
https://domainID.lightning.force.com/lightning/setup/ConnectedApplication/homeReplace
domainIDwith your actual Salesforce domain.
If the Lightning Experience loads successfully, you can proceed with creating the app there. If you encounter a “We can’t display this page” error, use Salesforce Classic instead:
https://domainID.my.salesforce.com/02u?retURL=%2Fui%2Fsetup%2FSetup%3Fsetupid%3DDevTools&setupid=TabSetThis link takes you directly to the Connected Apps section in Classic. Click the “New” button to begin creating a new Connected App.
Configuring the Connected App
- Connected App Name
- API Name (auto-filled)
- Contact Email
Enable OAuth Settings
In the API (Enable OAuth Settings) section:
- ✅ Check “Enable OAuth Settings”
- ❌ Uncheck “Use PKCE” if it is enabled by default
👉 For OAuth scopes and other configuration: 📎 Follow the settings shown in the attachment provided below. This includes required scopes, session settings, and IP relaxation options to match your platform’s requirements.

Save and Retrieve OAuth Credentials
Once you save the Connected App:
- Go to App Manager
- Locate your app in the list
- Click the dropdown arrow ▾ → Select View
You’ll now see your:
- Consumer Key (Client ID)
- Consumer Secret (click to reveal)

The Salesforce integration was introduced in version 7.8.0.
SEO Server Side
Server-side tracking bypasses ad blockers and ensures accurate data collection. You can choose to track all forms or select specific ones. Setup requires only your GA4 Measurement ID and API Secret Key.
Getting Your GA4 Credentials
Measurement ID:
- Go to Google Analytics 4
- Admin → Data Streams → Your Website
- Copy the Measurement ID
API Secret Key:
- In Data Stream settings
- Find “Measurement Protocol API secrets”
- Click “Create” → Name it “WordPress Forms”
- Copy the secret key
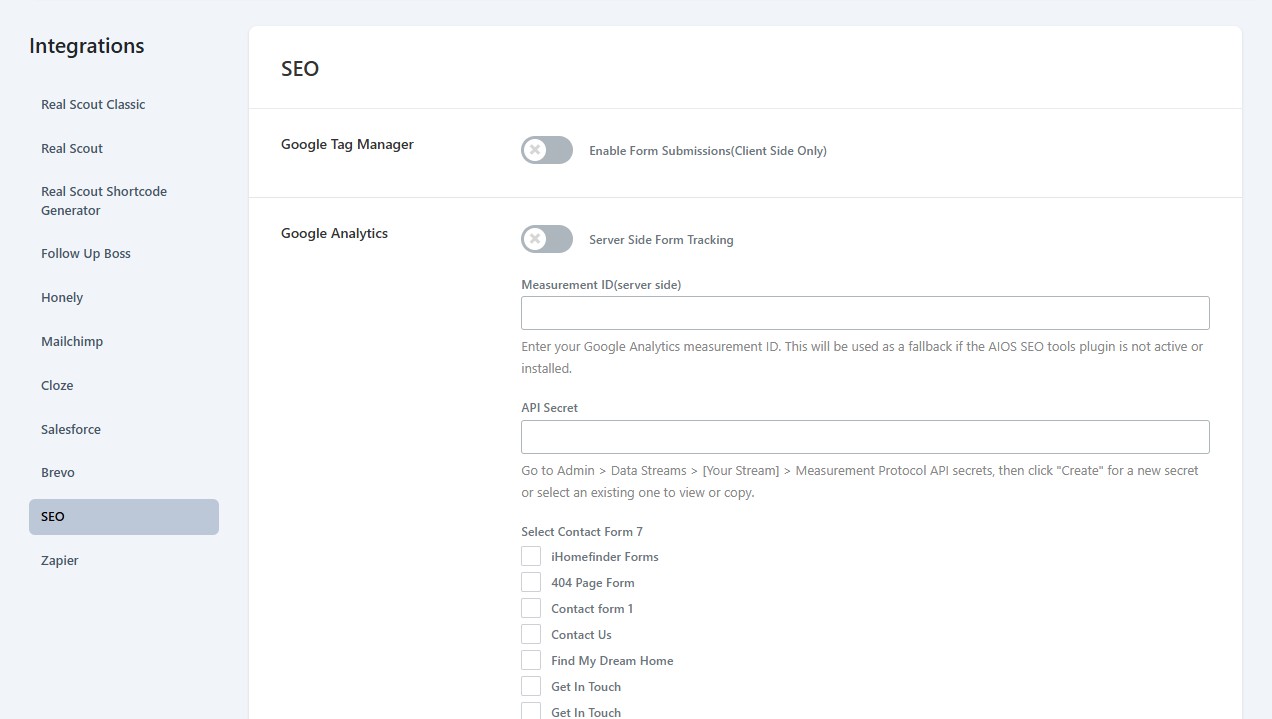
The SEO server side was introduced in version 7.12.3.
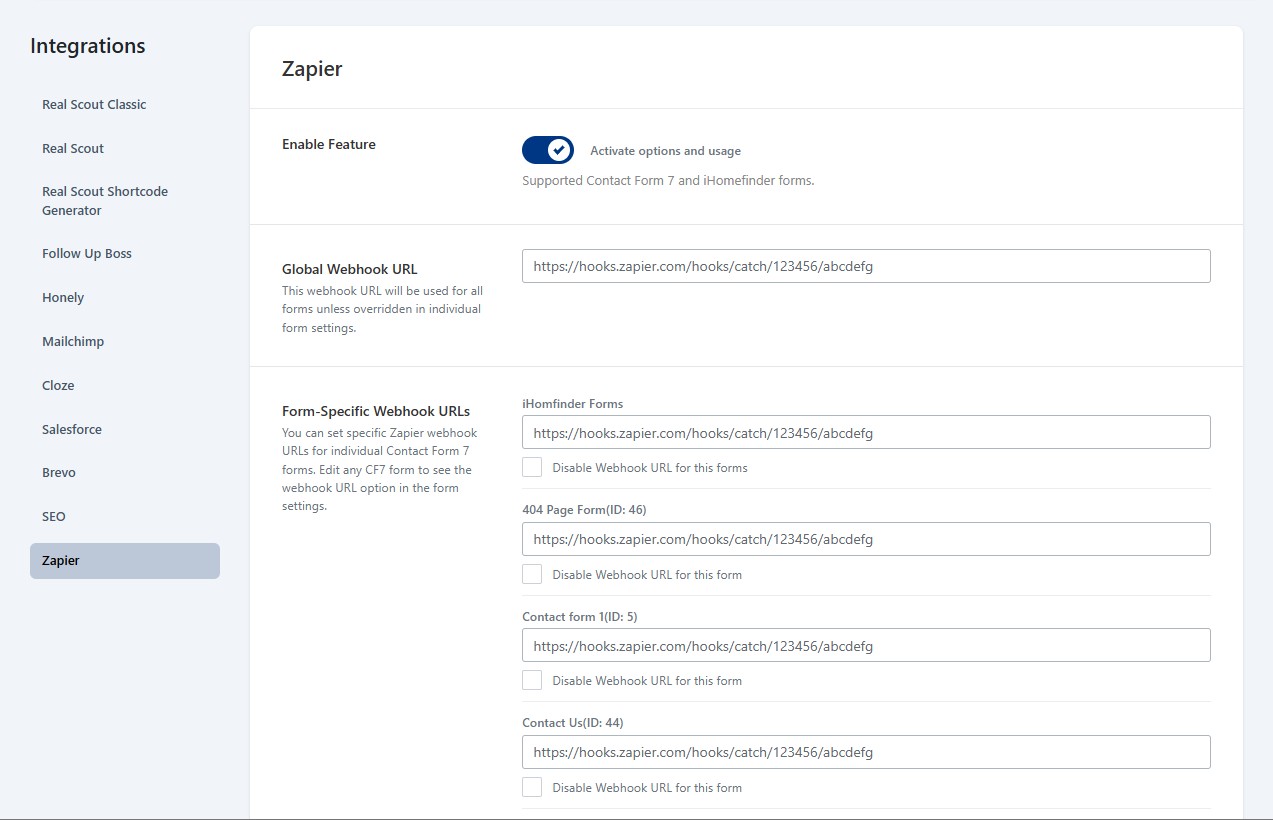
Zapier
Add Zapier webhook integration to your Contact Form 7 and iHomeFinder forms with global and form-specific webhook URL options.
Getting Your Webhook URL from Zapier
- Create a New Zap in your Zapier account
- Choose “Webhooks by Zapier” as your trigger
- Select “Catch Hook” as the trigger event
- Copy the webhook URL (looks like:
https://hooks.zapier.com/hooks/catch/1234567/abcdefg/)
WordPress Configuration
Global Settings
- Navigate to your Zapier Integration settings in WordPress admin
- Enable the Zapier integration toggle
- Paste your webhook URL in the “Global Webhook URL” field
- Save settings
This global URL will be used for all forms unless overridden.
Form-Specific Settings
Contact Form 7
- Go to Contact > Contact Forms
- Edit the desired form
- Find the Zapier Webhook Settings section
- Enable webhook for this form
- Enter custom webhook URL or use global setting
- Save the form
iHomeFinder Forms
- Edit your iHomeFinder form
- Find the Zapier Integration section
- Enable webhook toggle
- Enter webhook URL or leave blank to use global setting
- Save form settings
How It Works
Priority Order:
- If global integration is disabled → No webhooks sent
- If form webhook is disabled → No webhook for that form
- If form has custom URL → Uses form-specific URL
- If no custom URL → Uses global URL
- If no URLs configured → No webhook sent
Quick Test
- Submit a test form on your website
- Check your Zapier dashboard for incoming data
- Verify the form data appears correctly
Troubleshooting
Webhooks not working?
- Check if global integration is enabled
- Verify form-specific webhook is not disabled
- Confirm webhook URL is correct (copy/paste carefully)
- Test the URL directly in Zapier
Wrong data received?
- Check which webhook URL is being used (form-specific overrides global)
- Verify the webhook URL is active in your Zapier account
The Zapier integration was introduced in version 7.12.3.